
Replacing the rear subframe (part 4)
Click on the images to enlarge
My Dad came to visit one weekend and noting my lack of progress with my project over the last few weeks he offered to help. Here's how we finally completed fitting the subframe plus fitting and setting up the rear suspension, bleeding the brakes and fitting the fuel line.
I'd left the rear sub frame up on a trolley jack with the front bolted into the heel board and the back end slightly out of align. We decided to work on the right side first. Unbolting the trunnion from the heel board we lowered the right hand side of the sub frame down and then fitted the rear trunnions first, then the front ones. We did the same on the left hand side. It was easier working back forwards on each side as the rear trunnions are a pig to get lined up. Insert the rear (longer) of the two bolts first. Use a screwdriver in the front hole inserting it down through the boot so you can line up the holes. If you cannot get the smaller bolt in you could always do what we did and stick it in a socket and extension resting on a trolley jack and jack it up into place so you can get the washers and nut on the end.
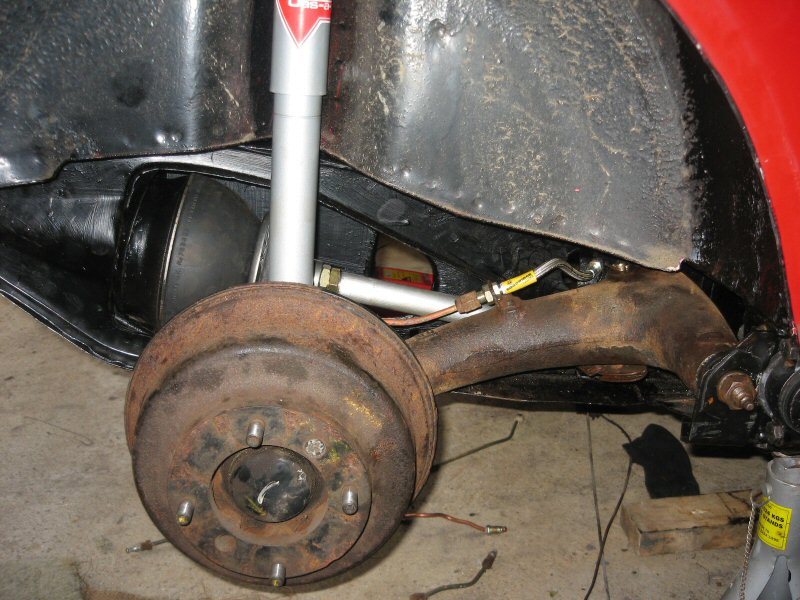
With the subframe on we made sure all brake pipes were fitted and secure. Next starting on the right hand side again we fitted the radius arms. Insert the thread into the subframe and hold it in position. Slide the mounting bracket onto the thread near you and hold in place. Let the hub rest on your trolley jack as you insert the top bolt into the bracket. Once half in, insert the lower bolt half-way followed by the two bolts on the underside. Make sure that you have not trapped the flexible brake pipe between the radius arm and the subframe. Tighten all four bolts to secure the radius arm in place. Place the washers and nuts on either end of the radius arm and tighten. Your radius arm should now be secure in place.
Next unscrew the outer nut from your flexible brake hose and insert the end of the hose through its slot in the subframe. Insert the nut on the other end and tighten until the brake hose is secured to the subframe. Next connect the copper brake pipes fitted to the subframe to the end of the flexible pipe. Make sure that all of the rear brake pipe unions are tight and secure.
Next lower the radius arm so you can get to the inner part of the subframe. Grab your Mini rubber cone spring and fit your Hi-Lo suspension arm (trumpet if using stock parts). Fit the well-greased knuckle joint into the bottom cup of the radius arm. Insert the rubber cone spring into its seat in the subframe. With the radius arm as low as it will go there should be a gap between the end of your Hi-Lo arm and the knuckle joint. Raise the wheel hub until you can slide the knuckle joint into the Hi-Lo arm. Hold in place using the trolley jack. Slowly lower the hub and with your hand pull the rubber cone out of its seat so that when the hub is lowered the Hi-Lo arm does not part company with the knuckle joint. Now using large spanners wind out the adjustable arm until the rubber cone is sitting comfortably in its seat. Use a grease gun to grease the Hi-Lo and the radius arm.
Next with the hub as low as it will go slide the bottom of your damper unit onto the bolt located at the rear of the hub. Rotate (and maybe twist) the whole unit until you can point the damper upwards inside the wheel arch. Put the washer and nut on the bottom of the damper and tighten. Put the metal cup and rubber bush on the top of the damper and push it all up through the top of the wheel arch. Place the other rubber bush and metal cup on the top of the damper in the boot space and put on the first nut and tighten then the next. Tighten both nuts against each other. Make sure that both ends of the damper are secure.
Once you have completed both sides, put the wheels on the car and jack the car up and remove the axel stands and lower to the floor. With an adjustable suspension fitted you can set the ride height how you want. Take a tape measure and measure from the bottom lip of the wheel arch to the middle of the wheel hub. As I have not replaced the front suspension I need to set up the ride height to be the same as the front. This is about 13.5 inches on my car. To do this you take a measurement, jack up the side you are adjusting. Now take off the wheel and wind out or in to increase or lower the suspension to suit. Then tighten the locking nut (the one nearer the rubber cone). Replace the wheel and lower the car. Take another measurement. Repeat until the ride height is how you want it and then do the same for the other side.
With the rear sub frame, suspension and brake lines back on the car it could finally be wheeled out of the garage.
The next job was to bleed the brakes. For this you need a clean glass jar, a brake bleeding pipe, a small spanner, probably 10mm, and some DOT4 brake fluid.
Starting with the furthest wheel from the brake fluid reservoir (in this case, the left rear) jack the wheel up. Put your spanner on the brake bleed nipple at the rear of the wheel hub and attach the bleed hose to the nipple. Insert the other end of the hose into the glass jar. Take the top off of the brake fluid reservoir and top up with DOT4 fluid until you reach the MAX level. Now using the spanner slacken the bleed nipple. Now pump the brake pedal until fluid comes through the hose into the jar. Tighten the bleed nipple and remove the pipe and spanner.
Repeat for the rear right wheel, then the front left and then finally the front right.
My front right bleed nipple would not allow and fluid to flow because it was blocked. This had to be removed and cleaned. To do this unscrew the nipple and block the hole (a finger is great if you have an assistant!). Clean the nipple and using a small pin, needle or drill bit clean out the hole at the bottle and the shaft down the middle. Remove any excess dirt and replace the nipple and proceed with the bleeding procedure.
Top up the brake reservoir if the fluid has fallen below MAX.
My next job was to fit the fuel line. I had already fitted the rear of the fuel line to the back of the car because the grips are behind the subframe so you have to fit the pipe to the body before putting the rear subframe back in. I made sure I had enough pipe and bent it slowly to shape. The rest was in a coil secured to the bottom of the car.
Jack the front left wheel up and secure with an axel stand. Then uncoil the pipe with your hand and straighten it out and shape it to fit using only your hands! I used tape wrapped around the parts of the pipe that were going to be gripped by the grips attached to the under body. Feed the pipe into the grips and then bend the grips over the pipe to hold it in place. Do not compress the pipe!
It's a right pain to get the front in so I took off the front left wheel to have more room to work. I fed the pipe up into the engine bay following the securing points. I slid the pipe around the inside of the rear left front subframe mounting point and upwards behind the subframe and behind the left hand side steering rack gaiter (rubber accordion looking cover).
The rubber pipe feeding from the front of the fuel line into the fuel pump has perished so I need to replace that along with its securing clips. Plus the rubber pipe from the petrol tank to the rear of the fuel line has cracked so I am going to replace that as well.
Did you enjoy this article or find the information useful? Help keep Dave and his articles online by keeping him fed with coffee by clicking the link below. Cheers!

Next page - Mini rust problems
Previous page - Replacing the rear subframe (part 3)
Back to the Mini Project Main Menu

This website uses cookies. Click here to learn more about how and why we use cookies.