
Cooling system maintenance and repair
Click on the images to enlarge
I'd driven the Mini into town, parked it and nipped into a few shops. On returning to the car I noticed a puddle of brown water under the bonnet. On closer inspection I could see that the radiator was leaking. I always carry spare water with me so I topped up the radiator and drove the car back to the office and at the end of the day I topped it up again and drove it home.
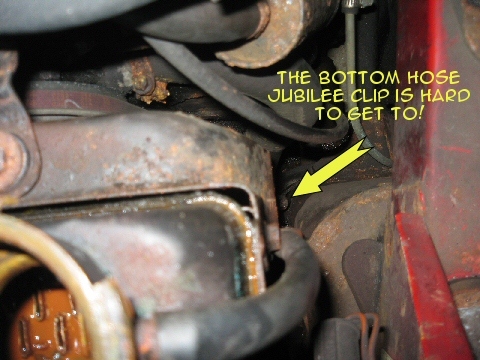
I inspected the radiator and couldn't find anything wrong, but when I topped it up it would slowly leak out from somewhere, dripping off the bottom of the front subframe. I jacked up the front left of the car and removed the road wheel but I found access to be non-existent and I couldn't reach the hose clip at the bottom of the radiator with any tool. As my car is the later (non MPI) model there is no radiator drain plug. So I replaced the road wheel and decided to remove the radiator from the car so that I could carry out some s.
This proved easier said than done. it looks like the hose clips are the originals (now 20 plus years old) and were nothing more than rusted pieces of wire with lumps of rusted metal for screw heads.
One thing you learn to acquire when working on Minis for any length of time is patience. You will go through phases of wanting to throw a hammer through your windscreen and just wanting to smash something to thinking about getting rid of your beloved Mini because it's all just too much. Minis rust. They rust fast and they are small, low to the ground and collect dirt like crazy. Combine all that with a 1959 design and you have a car that needs regular maintenance, has small parts in hard to get to places, and requires more tools than you probably own (but will acquire with each new job). Working on a Mini demands patience. Trust me on this. If it all gets too much just take a break, think about the problem and come back to it later. While thinking about it add mole-grips and a junior hacksaw (with spare blades) to your toolkit. You'll thank me later.
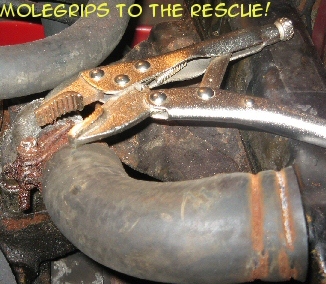
It probably took me an hour to get the radiator out of the car. First I tried mole-grips to get the wire clip heads moving. Then I resorted to using a junior hacksaw to cut the screw heads off and then prised the wire clip off with a screwdriver.

To remove the radiator you also need to undo two of the three bolts that hold your thermostat housing on and the big pivot bolt at the base of the radiator. You will have to remove the grill to get to the pivot bolt more easily. I also removed the two bolts at the top of the radiator that attach the other end of the top mounting bracket to the radiator as I wanted to pivot the rad up and over the fan with the bottom hose still attached.
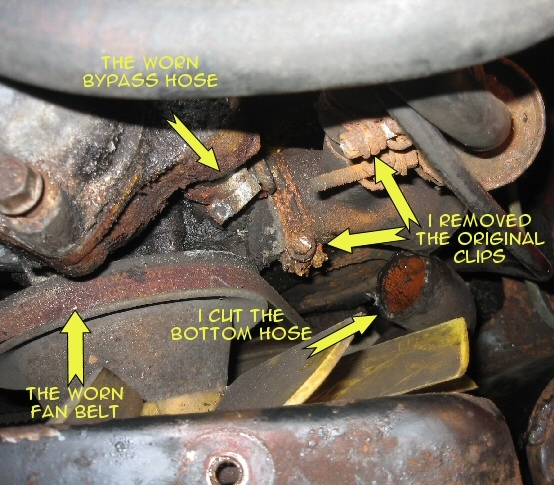
The bottom radiator hose was attached with a modern jubilee clip so that came off easily, but only after I had sliced through the bottom hose with a Stanley knife to aid with the removal of the radiator as I knew I was going to replace the hose anyway and it made the job easier.
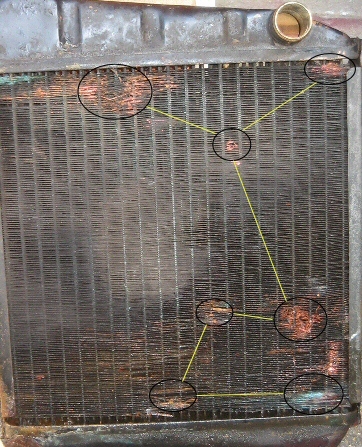
I inspected the radiator and found that it was full of holes on the fan side, which was strange. This could be due to a lack of coolant over the years. Well it is over 20 years old! I had also tried removing the radiator cowling shroud to see if it made getting the radiator out that much easier, but it didn't. With the radiator finally out I inspected the hoses. I looked online to get an idea of prices and learned that most places were selling silicon hoses which were rather pricy. I contemplated getting some in blue then called the local parts place I use a lot and they quoted replacements for a fifth of the cost of the silicon ones so I ordered a bottom and top hose. I also picked up some new jubilee clips and a fan belt as I figured it needs changing and I might as well do it while the radiator is off.
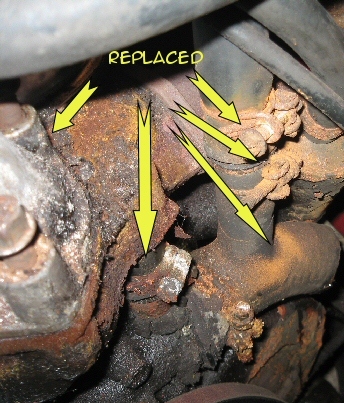

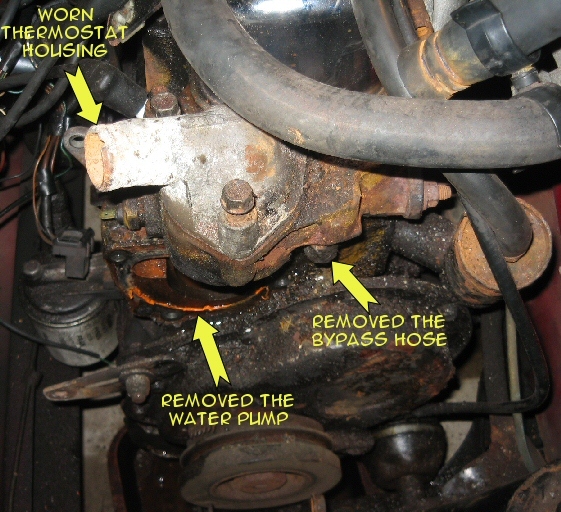
During the process of removing the bottom hose I discovered that there is a small hose that goes from your engine head to the water pump and it was basically in tatters and held together by dirt. It literally fell to bits when I touched it! I also discovered that water was leaking from the water pump. As it looked like I needed to order even more parts I decided to inspect the rest of the cooling system so I could get everything I needed to do the job in one more trip to the parts dealer.
The thermostat housing was not looking too great but I had a spare lying around along with a universal gasket which I could cut to size. The thermostat looked ok-ish but I decided to get a new one while I was at it and I'll keep the old one as a spare.

I rarely buy Mini magazines but I'd purchased a copy of Mini Magazine recently and there was an article that mentioned the water pump and how aftermarket impellers were not that great or efficient. I removed my water pump and discovered that it was one of the ones that the article was referring to. Also there was a large gap between the impeller and the pump body so I decided I'd get a new one while I was at it. The local parts place was slightly cheaper than online for the pump and gasket but I wanted to check the impeller before purchasing. It turned out to be the type recommended by the magazine so I bought it.
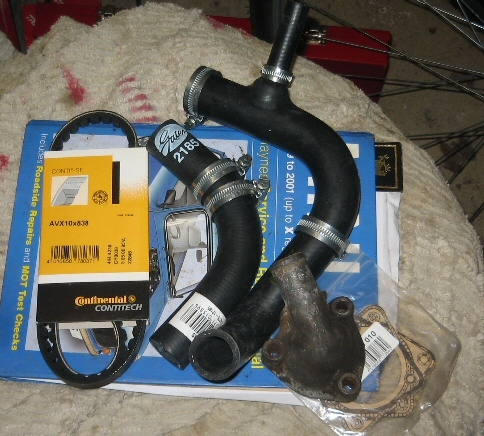
So parts wise I'd bought a new water pump with gasket, a new thermostat, a fan belt, antifreeze, top and bottom radiator hoses, a bag of mixed size jubilee clips and one foot of hose of which part will be used as a new bypass hose (they sell hose by the foot at the store). The lot came to the cost of a good 3-course meal with a couple of drinks. Not bad! It would have cost me a lot more if I didn't have a spare radiator and thermostat housing lying around.
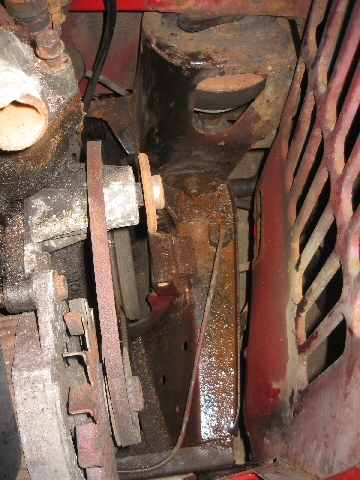
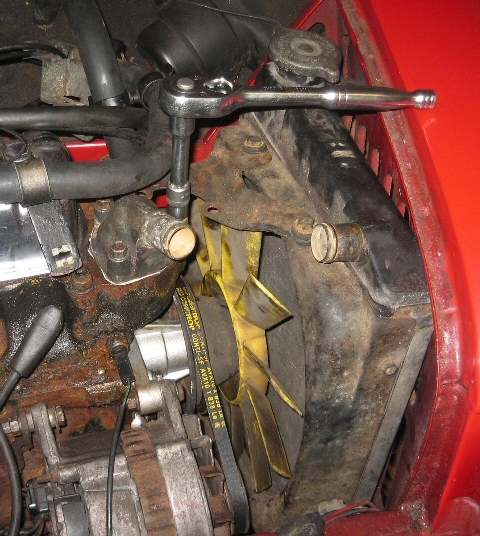
By now there was a large void at the side of my engine. I'd removed the radiator, the top and bottom radiator hoses, the fan and pulley and water pump, the bypass hose, the alternator and the thermostat housing and the thermostat itself. I gave the side of the engine a good clean with a clean rag making sure that I didn't work any dirt into the engine. I also cleaned up the parts of the front subframe that I could see.

First I fitted the new thermostat. The guy had sold me the 82-degree type and I'd said at the time that I was sure that I needed the 88-degree type but he said this was the one listed for my car. When I got home I learned that all Minis after 1976 should have the 88-degree one fitted. However the Haynes manual does say that the 82-degree ones can be used in average weather conditions. The one I removed was in fact an 88 so hopefully the 82 will be ok, if not I'll replace it as they don't cost that much and they are easy to fit.
I cut the universal thermostat housing gasket to shape with a Stanley knife and fitted the housing and gasket and bolts, but not too tight as the radiator top bracket needs to attach to two of them later.

Next I placed the long bypass hose on to the water pump and held the water pump against the side of the engine so that I could see how long the bypass hose needed to be. I cut it to size and fitted it to the engine-end first, securing it with a jubilee clip. I then placed another jubilee clip over the other end and attached it to the water pump. I placed the water pump against the side of the engine and fitted two of its four bolts, one long and one short diagonally across from each other. I had to wiggle and angle the pump until I could screw in the bolts. Don't forget the gasket! With all four bolts screwed in part way I worked slowly tightening one, then the one diagonally opposite until all four were tight. I then tightened the bottom jubilee clip on the bypass hose.
Next I attached the bottom radiator hose to the water pump and attached the hose that goes to the car heater to the side exit pipe on the bottom hose. I ended up attaching the heater hose to the exit pipe in such a way that it would later foul the water pump fan, so I had to disconnect it, move it over the top of another hose and reconnect it so it was far enough away from the fan.
When putting the pulley and plastic yellow fan back onto the water pump I noticed that it looked wrong somehow. I compared it to the digital photo I had taken when removing it and it was correct. However I had a spare fan and pump assembled on the shelf (but the pump was worn) and the fan was the other way around on that. I cleaned the dirt off my fan and noticed the words "engine side" on one side. It looks like a previous owner had put the fan on the wrong way around!

With the fan and pulley attached to the water pump I re-attached the alternator and fitted the fan belt and pulled the alternator taught and tightened all the bolts. I then reconnected the alternator electrics and the wire with spade connector that goes to the engine temperature sensor located on the engine block beneath the thermostat.
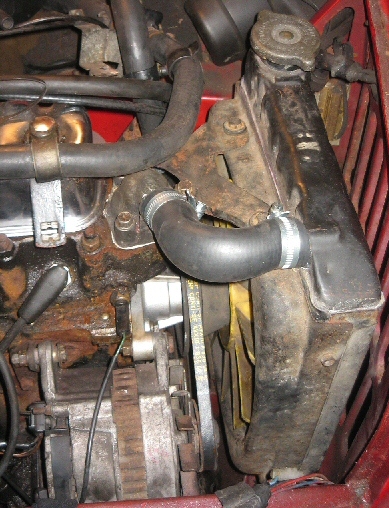
Next I pulled the bottom radiator hose upwards and attached it to the bottom of the replacement radiator securing it with a jubilee clip. I lowered the radiator in place and secured the bottom with the pivot bolt.
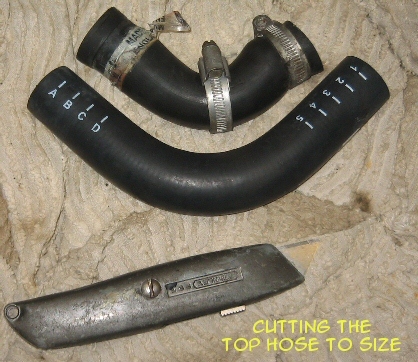
The top hose for the radiator was a universal type whereby you had to cut it to size. I measured it against the old one and cut it to C-4 size. I connected one end to the top of the radiator and slipped on two jubilee clips before connecting the other end to the thermostat housing. I then connected the top radiator bracket to the thermostat housing and tightened all four bolts before tightening the jubilee clips on the top hose.
With everything in place I pre-mixed a 75% water to 25% antifreeze mix and slowly poured it into the radiator using a clean funnel. I stopped now and again to squeeze the bottom radiator hose to let air out and to re-fit the front grill and tidy away my tools and general left-over rubbish. I slowly topped up the radiator until the coolant level had reached the top of the hooped piece of metal that you can see through the radiator filler cap hole. I replaced the radiator cap and started the engine and left it to run for ten minutes then turned it off.
I placed a large piece of cardboard under the engine bay and left it there overnight. In the morning I was happy to see no fluid marks on the cardboard and that the coolant level in the radiator had not dropped indicating there were no leaks. I drove the car to work and all was ok, the heater worked and the temperature gauge worked fine. At lunch time I topped up the coolant level as it had dropped after the short drive to work as the water pump had done its job circulating the coolant around the engine.
Job done!
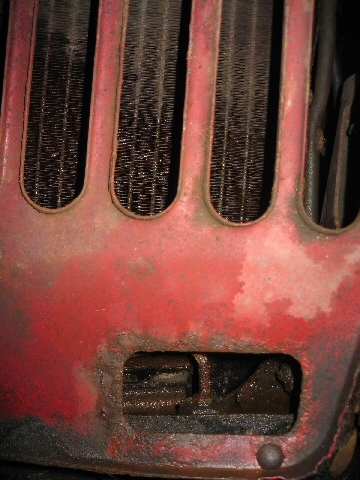
I've learned a lot from this particular job and I actually enjoyed myself. I learned that you must always top up your Mini's radiator with coolant and not just water as the coolant is not just antifreeze but an anti-corrosive as well, which your water cooling system needs to prevent rust! Look at the photos of my old radiator to see what happens if you only top up with water, even during the summer. Eventually there will be no coolant in your radiator and the radiator will rust!
I also learned how the Mini's water cooling system works, and that changing the inexpensive water pump not only improves the water circulation around your engine block, but it also makes your engine sound a lot better! I guess the bearings in my old pump must have been on the way out.
Replacing your fan belt when the radiator is out of the car is also a good idea. Although the old one looked ok, it had obviously been stretched because the alternator was almost touching the front grill extended all the way out on its sliding lower arm bracket. Whereas with the new fan belt fitted, the alternator was nearer to the engine block and there was no high-pitched whine coming from the engine bay when the engine was running with the headlights and wipers on.
One other thing worth mentioning is that I do know about Radweld, but I'm not a fan. I'd rather locate and fix the problem than try to patch it with a sealant that I've had mixed results with in the past.
Afterward: A few days later I noticed that the heater (hot air blower) in the car wasn't working too good. I figured that there was probably some air trapped in the system so with the engine cool and the car parked up I removed the radiator cap and started the engine and ran it for ten minutes until steam vapours started to come out of the radiator. I tried the heater and it was working so I replaced the radiator cap. Hopefully any air in the system has now had a chance to escape.
Did you enjoy this article or find the information useful? Help keep Dave and his articles online by keeping him fed with coffee by clicking the link below. Cheers!

Next page - Two no-fault car accidents - the Mini goes to the bodyshop
Previous page - On the road again
Back to the Mini Project Main Menu

This website uses cookies. Click here to learn more about how and why we use cookies.